How to Add a Client Portal to My Website
As a business owner, if you offer services to multiple clients then a WordPress client or customer portal will help you better manage your business. You'll be able to share files and documents with clients, distribute downloads, post news and updates, and much more. All of this is possible with a WordPress client portal plugin.
In this article, we'll show you how to create a private WordPress client portal by using the Password Protected Categories plugin to simplify client management. You'll also learn how to create a searchable, filterable table layout to help clients to find information more easily.
Before we begin, let's quickly take a look at why you might need to create a secure client portal on your WordPress site.
Why create a secure WordPress client portal?
Having a private WordPress client portal (or customer portal) is a great way to enhance your service offering. Essentially, it's a private area on your WordPress website that clients can access using a password.
Depending on the type of business you're running and your service offering, you can use a WordPress client portal to:
- Share content with specific types of clients, or
- Create multiple private areas in the client portal for individual clients.
Let's look at some examples.
Use case #1 - Design and consultancy services
If you offer design services and consultancy, you could set up two different areas in your client portal: one for your graphic design clients and another for clients who are interested in design consultancy. This way, you could share all design-related news, updates, information, and downloadable resources with your graphic design clients and all consultancy-related updates and resources (such as Google Docs or Google Sheets) with your design consultancy clients.
Alternatively, if you're a design agency that creates custom logos for businesses, you'd want to set up multiple private areas for individual clients. In this way, you can create a separate client area for each one of your clients and share downloadable resources, files, and PSDs with them. This also makes it easy for your clients to access deliverables and resources and improves project management.
Use case #2 - Photography client portal
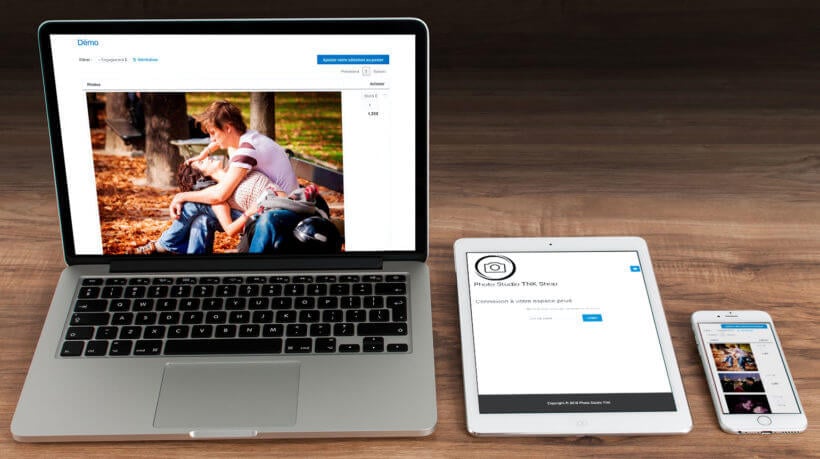
Most professional photographers need to upload photos to individual clients after a photoshoot. The client can then view their photos from a private and secure area - and possibly select photos and order them online.
You can do this with a WordPress client portal plugin. For photographers, the exact method depends on whether you want to sell photos online:
- Upload photos for clients to view only If you're uploading photos for viewing purposes only, then continue reading this tutorial. We'll provide step-by-step instructions on how to create a secure portal for each client in WordPress.
- Upload photos for clients to buy online Alternatively, if you want clients to pay for and order photos on your WordPress website, then you can do this too. Instead of reading the rest of this tutorial, use our complete guide to creating a WooCommerce photography website.
Password Protected Categories: The best WordPress client portal plugin
Password Protected Categories is a WordPress client portal plugin that lets you create secure, hidden areas within your WordPress website. You can do this by password protecting entire WordPress categories. This is also great for creating customer portals.
The Password Protected Categories plugin gives you two ways to create client-only content:
- Password protection - Create a category for each client and protect it by adding a single password to a category or multiple passwords. So, if you wanted to share content with specific types of clients, you could create a single password for each type of client. And if you wanted to create multiple private areas in your client portal for individual clients, you'd add a single password to a category. This is a good option when you don't want to create an account for each person, as they just need the password.
- Individual user account protection - Create a category for each client and automatically restrict it to one or more specific user accounts. When a user with access to that category logs into their account on your WordPress site, they can see the hidden client content. It remains hidden from everyone else.
Password Protected Categories
Create a private and secure client portal in WordPress.
What else can the client portal plugin do?
You can also create different areas within the WordPress client portal for different groups of client. For example, if you offer training services, you could create different categories based on their level of proficiency: Beginner, Intermediate, Advanced, each with different passwords.
In this way, clients who are beginners will only have access to Beginner resources and material. Whereas proficient clients would have access to Advanced training resources.
It's incredibly simple - both for you and your clients - because you don't need to create separate user accounts for each client. Instead, just give them a password and they can access the portral straight away. (Tip: You can add as many passwords as you like. So you can either give out shared passwords, or create a unique password or user account for each client.)
Now that we have a good understanding of why you might need to create a secure client portal, let's step through a quick tutorial on how to do this in WordPress using the Password Protected Categories plugin.
How to create a private WordPress client portal using Password Protected Categories
Password Protected Categories makes it easy to create a secure, private client portal in WordPress. Here's what you need to do to get started:
Step #1: Install and activate Password Protected Categories
Get the Password Protected Categories plugin and install it on your WordPress website. You'll receive a license key along with the plugin's zipped file in an email. Once the plugin is installed to your site, click the Activate button.
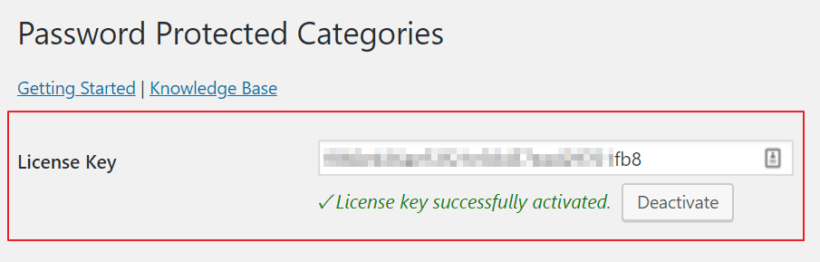
Next, head over to Settings → Protected Categories from the admin panel and enter the license key. Click the Save Changes button at the bottom of the screen to proceed.
You can also configure the plugin's settings from this screen. For example, you can change the title, form message, password label, placeholder, and button text for your password protected category login form.
Check out the plugin documentation for details of all the available options.
Step #2: Create categories and sub-categories for different types of clients or individual clients
First, you need to make two decisions about how to structure your WordPress client portal.
Decision 1 - One or multiple client areas?
The first thing you need to do is determine whether you'll be:
- Building a WordPress client portal where all clients can access the same information, or
- Creating a private client area for specific types of clients, or
- Creating a private client area for individual clients.
The process is the same for each approach. The only difference is how you'll go about structuring and naming the categories, and assigning passwords.
Regardless of which approach you go with, your clients will be able to access the appropriate area of the client portal with a password. Essentially, you can make shared or individual client areas as complex or as simple as you'd like without compromising on user experience.
Decision 2 - Posts, pages, or custom post type?
The Password Protected Categories client portal plugin works by restricting access to any type of category in WordPress. As a result, you can build your client portal using any content type.
The choices are:
- WordPress posts - The simplest option is to create one or more hidden categories under the 'Posts' section of the WP admin. You'll add each piece of content to the client portal as a 'post' - for example, if you're adding resources then each one will be a separate post. The hidden client portal categories can run alongside your public blog
- WordPress pages - If you'd rather use normal pages for the client portal content, then that's fine too. To do this, you need to enable categories for your pages and then you can create hidden password protected categories for your client portal.
- Custom post type - Perhaps you'd like a dedicated area for adding information to the client portal. To do this, you can create a custom post type. For example, if you create a custom post type called 'Client Resources' then a 'Client Resources' section will appear in the left hand side of the WP Dashboard. You can then structure it into one or more password protected categories for your WordPress client portal.
How to set it up
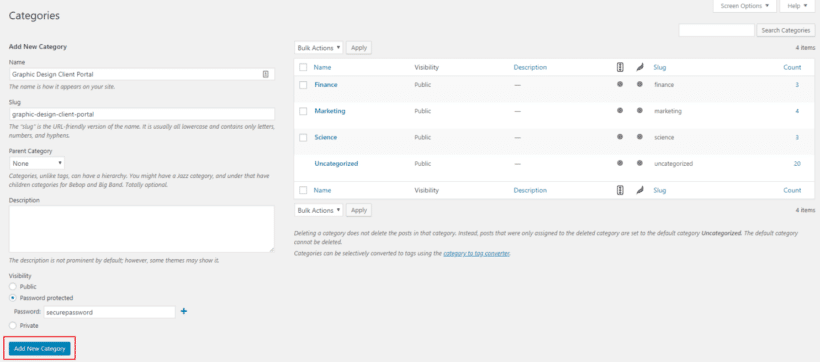
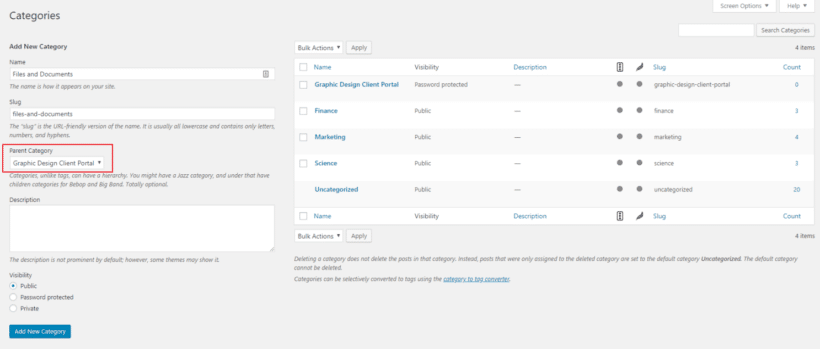
Head over to Posts →Categories from the WordPress admin panel to create a parent category. (Or if you're using pages or a custom post type, then go to the appropriate Categories page instead.)
Next, add in a category name and slug.
For example, if you wanted to create a private area for specific types of clients, you might call it Graphic Design Client Portal.
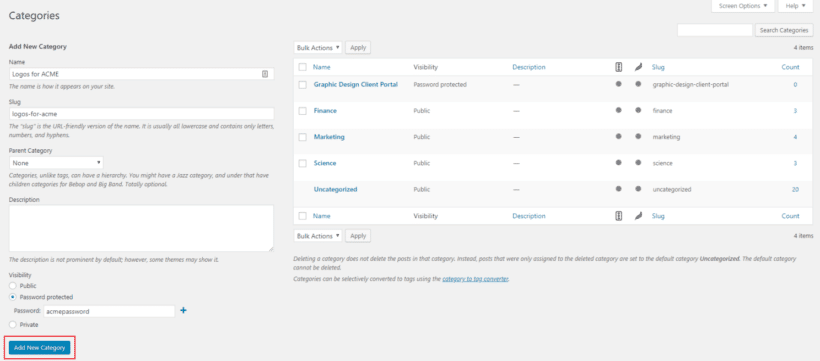
Alternatively, if you wanted to create a private client area for individual clients, you might call it Logos for ACME or something similar.
Once that's done, scroll down to the Visibility section and select the Password protected or 'Users' option. This depends on whether you want each client to simply login with a password, or for each person to have their own user account.
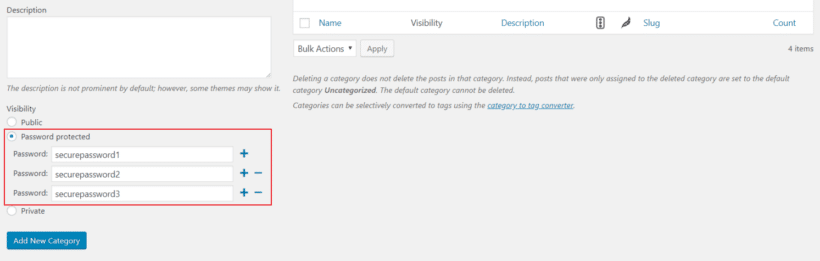
For password protected client categories, type a password. You can also choose to create multiple passwords. This way, you can give different clients different passwords to access the same client area. This makes your client area more secure and allows you to revoke a specific client's access without affecting other clients.
For user protected client categories, select which user(s) should have access.
Next, click the Add New Category button to proceed.
If you want to create a WP client portal where all clients can access the same information, then you can skip to the next step. Or if you want to show different resources to different clients, then repeat these steps. Create parent categories for the different types of clients you work with or for individual clients – depending on your specific requirements.
Create sub-categories
Now that you've created the main parent category, you can create as many sub-categories as you'd like to organize the resources to share with clients and set the parent category to Graphic Design Client Portal. This will help you keep things organized and enhance project management.
For example, if you need to share files, documents, templates, and resources with specific types of clients, you could create the following sub-categories: Files and Documents, Templates, and Downloadable Resources.
And if you wanted to make contracts, logo PSD files, and proposal requests available to individual clients, you could create sub-categories for each to keep things organized in the back-end for each client.
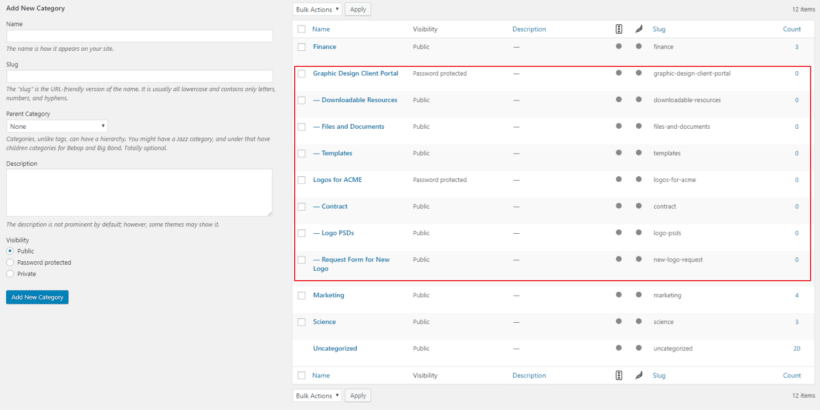
You don't need to change the visibility settings for sub-categories as they will already be protected. In other words, they'll only be visible to clients who have entered access to the parent category.
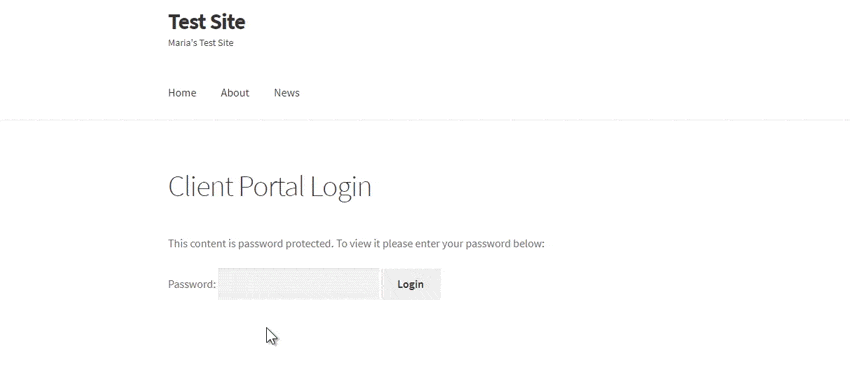
Step #3: Set up a centralized login page
To make it easy for clients to log in and view the relevant client area, we'll create a centralized login page. This only applies to password protected categories. If you've restricted the categories to each client's user account then you can use any type of WordPress login form, such as the one that comes with your theme or WordPress itself.
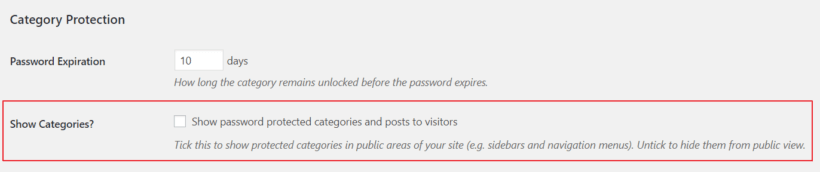
Head over to Settings → Protected Categories and make sure the box next to the Show Categories? option is unchecked.
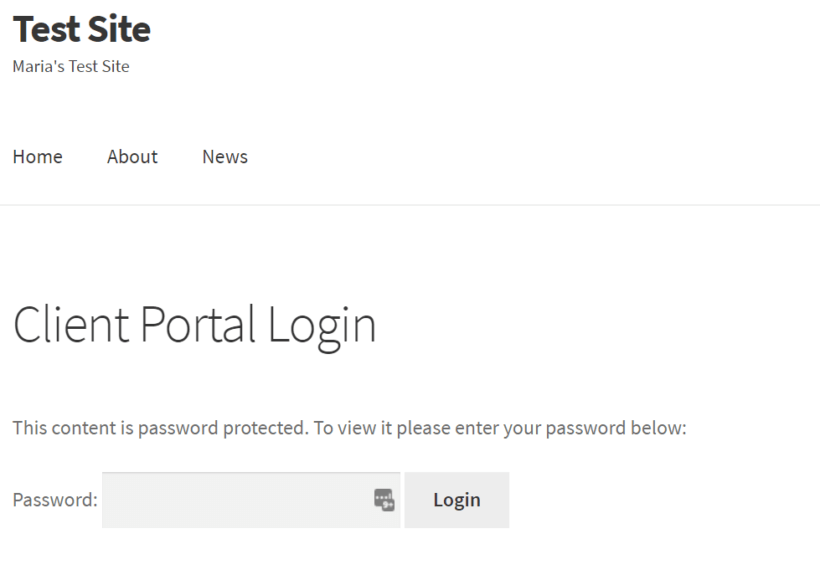
Next, go to Pages → Add New to create a new login page. You can name it something like Client Portal Login. In the text editor, enter the shortcode [category_login]. Click the Publish button to proceed.
If you preview the page on your site's front-end, you'll be able to see the centralized login page. It should look something like this:
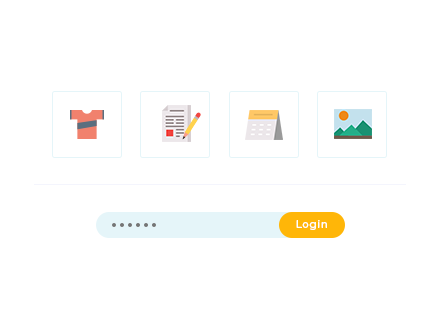
So, when a specific type of client (such as a Graphic Design Client) uses the password you've assigned them to log in to the client area, they'll only be able to see resources that are relevant to them:

Similarly, if you created private client areas for each client you work with, they'd be able to log in from the client area and access the resources that are relevant to them:

That's it! You can pair your client portal up with additional WordPress plugins and add-ons to leverage advanced functionality. For example, you could set up systems for invoicing, file uploads, and file-sharing or set up a fully white-label login page. You can also create a customer portal in the same way.
Step #4 - Add information to the client area
Once you've set up the overall structure of the WordPress client portal, it's time to start adding information to it!
Bonus tip - List your client portal in a searchable table
As you can see in the screenshots above, the default layout for your secure WordPress client portal will have a blog-style format. The posts are listed in reverse date order, just like a blog.
If you'll be adding lots of information to the client area, then you might prefer a more structured and interactive layout. That's where Posts Table Pro comes in:
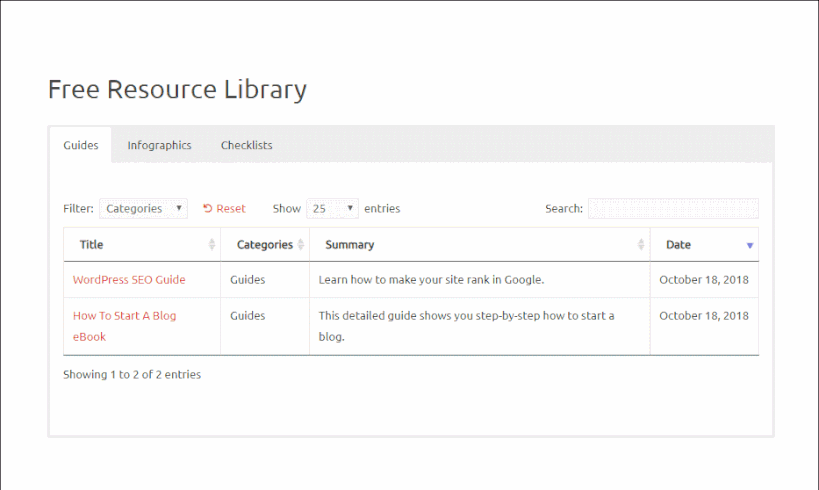
The Posts Table Pro plugin takes the contents of your client portal categories, and dynamically lists it in a searchable table with filters. As well as the instant AJAX search box, you can add dropdown fitlers above the table. It provides a much easier way for clients to quickly find the information they need.
Get Posts Table Pro
Where to get the plugin
Whether you'd like to create a private client area for the different types of clients you work with or a separate client area for individual clients, Password Protected Categories makes it possible. The best part is that the plugin is incredibly flexible and intuitive which means you can tweak it to fit your specific needs and requirements. This is a great way to simplify back-end client management.
Password Protected Categories
Create a private and secure client portal in WordPress.
Do you have any questions about creating a private, secure WordPress client portal? Are you thinking of a different implementation than the one covered in the tutorial? Let us know by commenting below!
How to Add a Client Portal to My Website
Source: https://barn2.com/wordpress-client-portal/